QR Code Photography: Capture Every Event Moment
Learn how to use QR code photography to collect event photos instantly. Practical setup guide, signage tips, and privacy best practices for hosts.
A QR code acts as a camera-readable gateway that connects guests' phones to a mobile upload page, so you don't have to chase photos through group chats. With approximately 4.88 billion smartphone users worldwide in 2024, the basic device needed for QR code photography is already in most attendees' hands, although a thoughtful setup still needs alternatives for guests who can't scan. (QR Code Statistics)
The last guest has left, the cake stand is empty, and the phones that captured the funniest dance-floor moment are heading home in different pockets. A week later, you're searching through group chats, asking relatives to resend compressed images, and wondering whether anyone photographed the speech from the other side of the room.
That's the gap QR code photography can close. It gives guests one clear route to upload photos and videos from their phones, while giving the host a structured place to review, organize, and share the event story.
Table of Contents
- The Problem With Chasing Event Photos
- Setting Up a Branded Upload Page
- Designing and Placing QR Signage
- Ensuring Inclusive Access for All Guests
- Managing Privacy and Consent Ethically
- Creating the Final Shared Gallery
The Problem With Chasing Event Photos
The traditional approach usually starts with good intentions. During the reception, someone creates a group chat and asks everyone to share their pictures. Another guest suggests a cloud folder. A family member promises to email photographs from a proper camera after the weekend.
Then the event ends. Some files remain in private camera rolls, some are buried under newer messages, and some are reduced to blurry previews by messaging apps. The host becomes the project manager of a memory-collection exercise, sending reminders while also trying to enjoy the first quiet days after the celebration.

Why manual collection breaks down
Manual requests depend on guests remembering, finding the right conversation, and having the time to upload. They also make the collection invisible. You don't know which parts of the event have been photographed, who still has useful footage, or whether a particularly meaningful candid moment is sitting on a phone that will never be checked again.
A shared social hashtag doesn't solve the problem either. Guests may not want private celebrations on a public platform, and the host has little control over what appears, who can download it, or how long it remains visible.
Practical rule: Don't make guests decide where to send a photo after the event. Give them one destination while the moment is still fresh.
QR code photography replaces the chase with a simple guest action. A person scans a sign, opens a browser-based upload page, and submits a photo or video from the same phone used to capture it. The QR code doesn't store the image. It provides a compact visual route to the web destination where the file can be uploaded, viewed, or shared.
The underlying technology was designed for camera-based reading rather than traditional barcode scanning. Denso Wave invented the Quick Response Code in 1994 to track automobile components during manufacturing, and its relevance to events emerged later as mobile phones gained cameras capable of decoding QR patterns. (QR code history)
For destination celebrations, the same principle works whether the event is in a hotel ballroom or on an island venue. Hosts researching professional coverage can also use a Mauritius photographer portfolio guide to think about how guest contributions should complement, rather than replace, a planned photography service.
Setting Up a Branded Upload Page
The QR code is only as useful as the page behind it. If guests scan and meet a confusing form, an unexpected login request, or a generic screen with no event name, many will abandon the process before uploading anything.
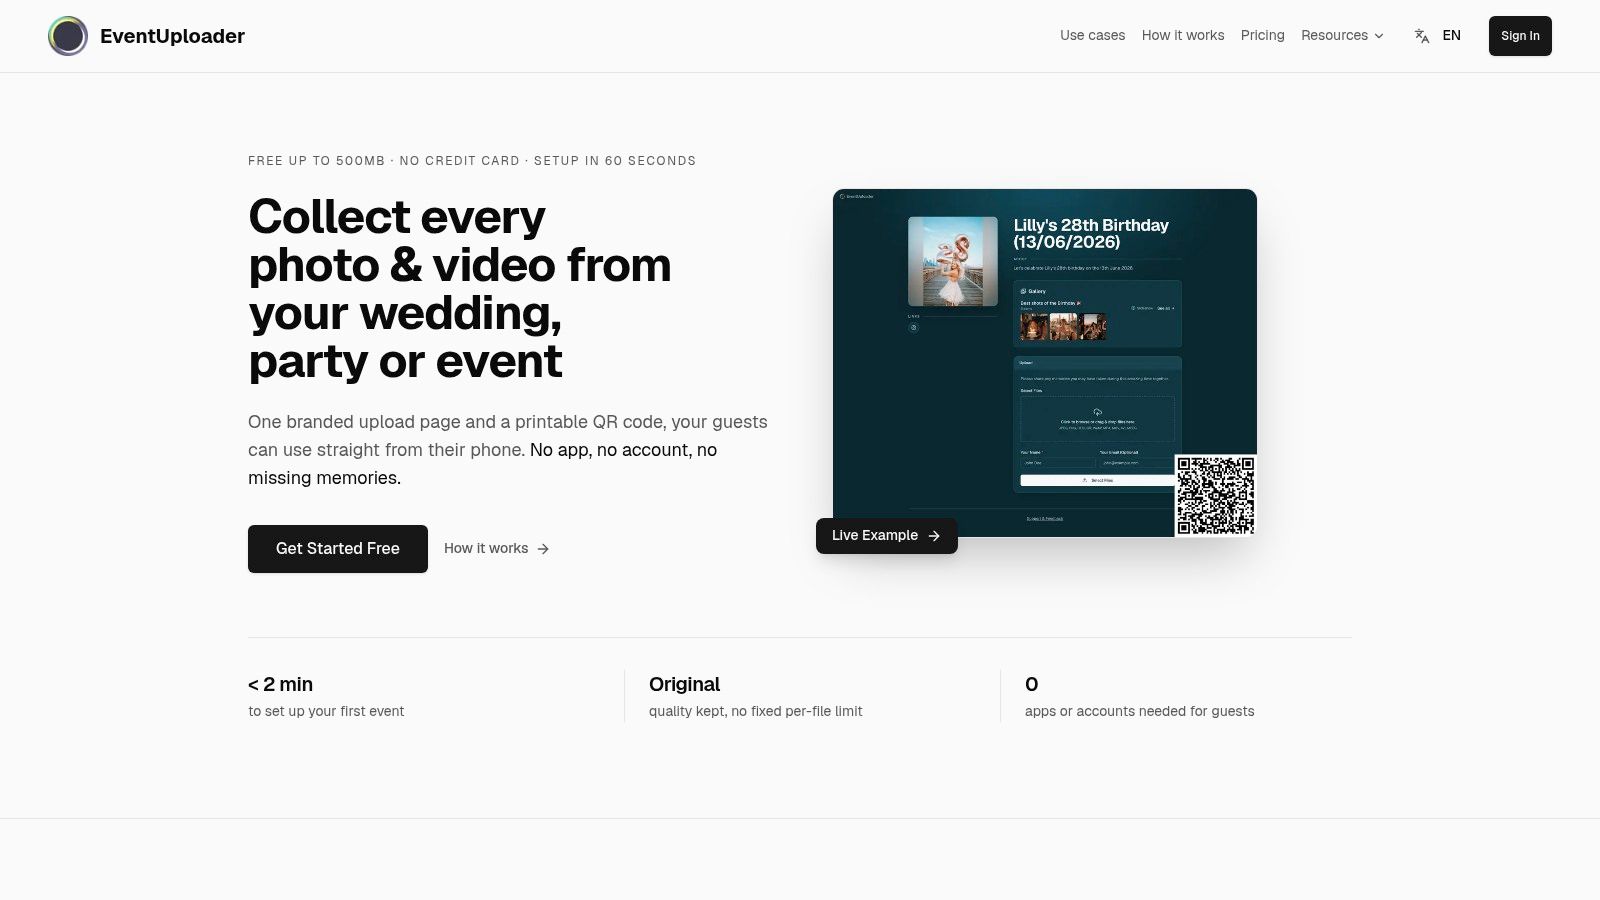
Start with a browser-based collection platform that supports a dedicated event page. EventUploader is one option that provides a printable QR code linked to a branded upload page, where guests can submit photos and videos without an app or account. The important decision isn't the logo treatment. It's whether the page opens quickly, explains the next action, and works on both iPhone and Android devices.
Build the page around the guest
Use the event name, host name, and a short welcome message so guests immediately know they're in the right place. Keep the primary button explicit, such as Upload photos and videos, rather than relying on an icon or vague wording.
Add a short instruction sequence:
- Scan the code: Open your phone camera and point it at the sign.
- Choose your contribution: Select photos or videos from your phone, or capture a new moment.
- Review before sending: Remove anything private or accidental.
- Upload: Submit the files to the event gallery.
The page should also tell guests what happens next. Say whether uploads go directly to a private host area, whether they'll be reviewed before publication, and how someone can request removal. These details establish trust before a guest hands over an identifiable image.
Create the shortest stable destination link you can. A compact URL produces a less complex QR symbol, which makes the printed code easier to scan at real event distances. Don't change the destination after printing unless your QR system supports a controlled redirect, and test the final link from the exact page guests will see.
For a practical walkthrough of the guest flow and setup considerations, use this guide on collecting QR code uploads online.
The page should remain useful after the event. Once moderation is complete, the same destination can lead guests to a curated gallery, provided access settings are appropriate. That continuity avoids sending a second unfamiliar link to people who have already participated.
Before printing anything, test the page on mobile data as well as venue Wi-Fi. A QR code that works only while you're connected to the office network isn't ready for a wedding, party, conference, or festival.
Designing and Placing QR Signage
The nicest sign at the event can still fail if guests have to fight it. I've seen well-designed QR displays become useless because the code was too small, printed on gloss, or placed where people never stop long enough to scan. Good signage has one job. Help a guest understand it fast, scan it fast, and move on.
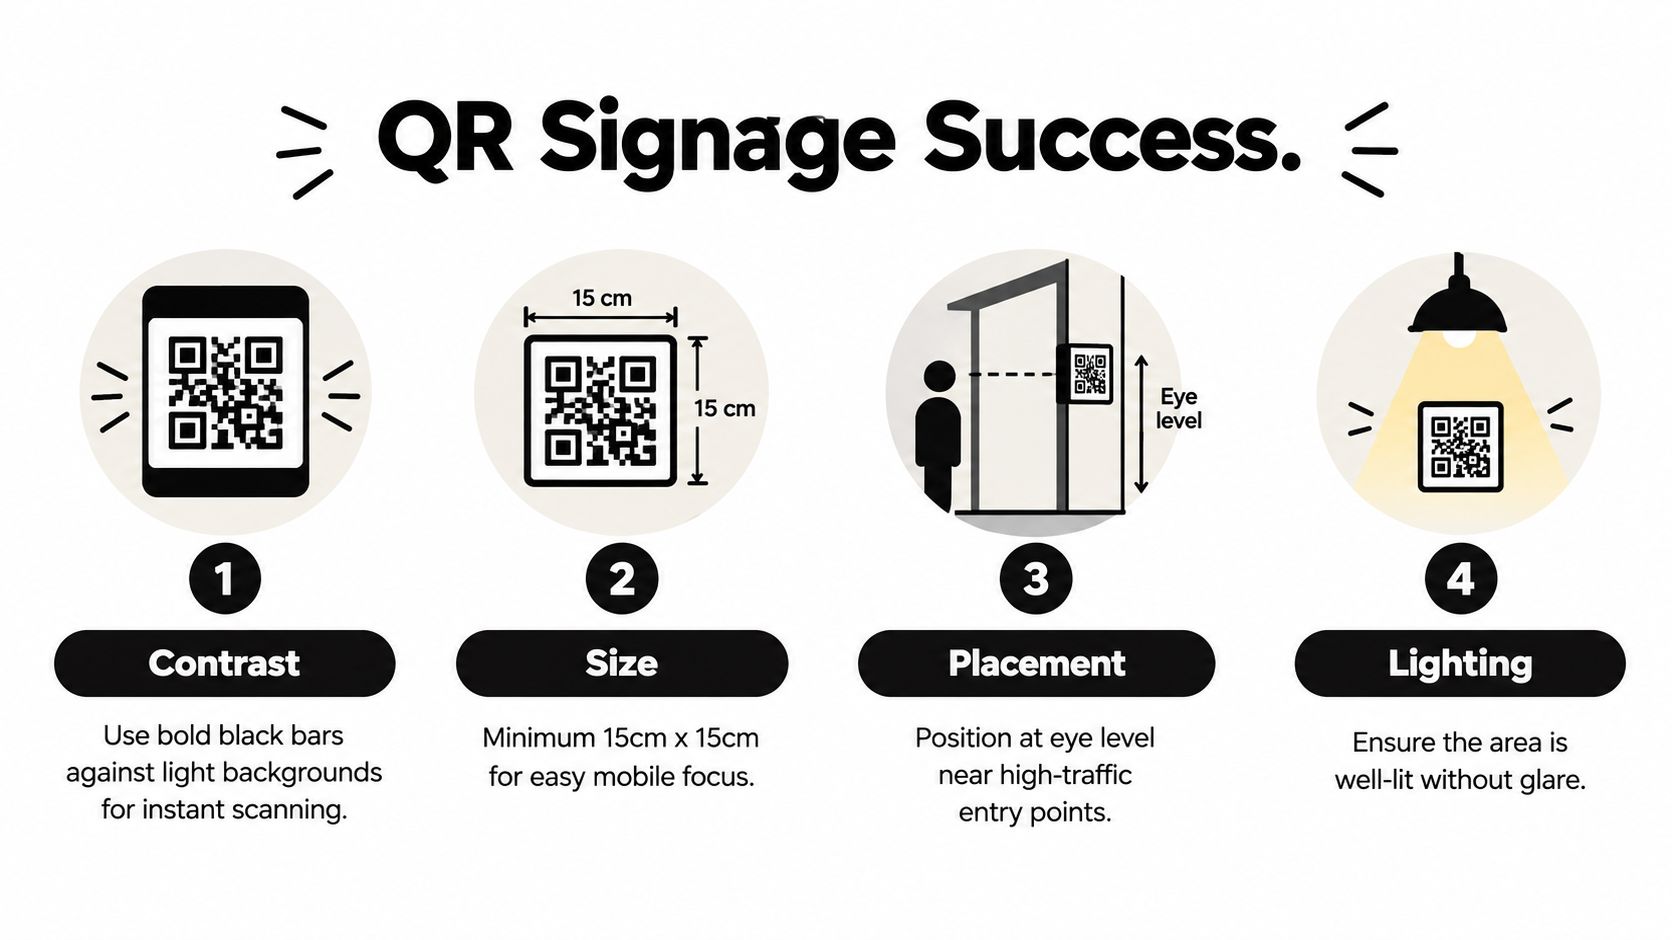
Start with the code file. Use the shortest stable URL, export vector artwork when you can, and keep dark modules on a light, matte background. Leave the quiet zone completely clear. ISO/IEC 18004 calls for a blank margin of at least four modules wide on every side, and that same standard is also a useful reference for practical sizing, including the common 10:1 code-width-to-scanning-distance rule. A code scanned from 1 metre should be about 10 centimetres wide. Treat that as a working starting point, not a guarantee, because paper stock, glare, and camera quality still affect results (ISO/IEC 18004 sample).
Make the physical sign do the explaining
A bare code asks too much of people. Add a short instruction above it, such as Share your favorite moments, then place the typed fallback URL directly underneath. Guests should know what happens before they scan, especially at weddings and family events where older relatives may hesitate if the sign feels technical or vague.
Keep the text large and high contrast. If the room is dim, candlelit, or outdoors near sunset, weak contrast turns a simple action into guesswork. Matte finishes usually scan better than glossy ones, and a clean white background usually beats decorative textures, metallic inks, or translucent acrylic.
Test the physical proof, not just the file on a screen. Print it at final size. Then scan it from the furthest realistic guest position with several iPhone and Android devices. Check it in daylight, low light, uneven venue lighting, and on every format you plan to use, including table cards, foam board signs, and folded inserts. If one version struggles, fix it before it goes to print.
Put signs where guests naturally pause
Entrance signage works because people arrive with a free hand and a little attention. Table cards work because guests are seated and not rushing. Bars, lounges, dessert tables, and photo booth areas are also strong placements because people queue, wait, and look around.
Don't rely on one hero sign across the room. A code behind the DJ booth, next to a bright window, or squeezed onto a menu often gets ignored or scanned badly. Use several signs, but make sure they all point to the same destination so guests are not choosing between versions.
If the event includes branded favors or guest gifts, keep the QR sign visually consistent with the wider display. A guide to high-quality event giveaways can help with the broader presentation, but curved, glossy, or heavily textured items need real-world testing before you trust them with the main code.
For production checks, this guide on how to print QR codes covers the practical details that prevent last-minute failures. The final scan test should always happen under venue lighting, where glare, blur, and awkward viewing angles show up fast.
Ensuring Inclusive Access for All Guests
A QR code removes app installation, but it doesn't remove every access barrier. Some guests use older phones, enlarged display settings, screen readers, limited data plans, or accessibility features that change how camera links behave. Others don't feel confident scanning a printed pattern.
An inclusive event treats QR code photography as a service with more than one entry point. The QR code is the fastest route for many people, not the only route.
Build a fallback into every sign
Print the short web address beneath the code in readable text. Avoid a long tracking URL full of random characters. A guest who can't scan should be able to type the address without copying a complicated string from a crowded sign.
Use plain language:
- Scan or type the address: Choose whichever is easier.
- Upload from your phone: You don't need a separate app.
- Ask for help: A named person can assist with uploading.
- Prefer not to upload: You can still enjoy the event without contributing.
Large, high-contrast signage and a clear quiet zone help guests whose vision or motor control makes small, crowded graphics difficult. Good lighting matters, but don't point a spotlight directly at a glossy sign. Reflection can make the code harder to read.
Provide a human route
Assign an upload helper, such as a family member, venue host, photographer, or event staff member. Their job isn't to take control of someone's phone. It's to explain the process, help open the page, and let the guest choose which files to submit.
Connectivity needs a fallback too. If the venue has weak service, place signage where reception is more reliable and tell guests they can upload later from home. A small number of printed instruction cards or a designated shared device can support guests who don't have a suitable smartphone.
QR adoption is broad but not universal. A forecast cited approximately 100 million U.S. smartphone QR-code scanning users in 2025, while also noting the need for an up-to-date smartphone and a decent internet connection. (QR code forecast) That supports a practical conclusion: QR codes can reduce friction, but they don't guarantee universal participation.
Managing Privacy and Consent Ethically
Guest-upload galleries combine identifiable adults, children, private celebrations, workplace moments, and sometimes videos recorded without everyone's knowledge. A password or unlisted link can limit access, but possession of the link isn't the same as informed consent.
The host should explain the process before guests upload. A short notice on the page or sign can say who controls the gallery, whether submissions are reviewed, who may see approved files, whether downloads are enabled, and how a guest can request deletion.
Separate capture from publication
A guest may be comfortable taking a candid photo while objecting to that image appearing in a gallery shared with every attendee. Treat those as separate decisions.
Use a workflow that keeps new uploads in a private host-review area by default. Review faces, children, sensitive conversations, accidental captures, and anything that could embarrass someone outside the event context. Don't publish a file merely because it was submitted.
A useful moderation checklist includes:
- Identifiable people: Consider whether the people shown would reasonably expect the image to be shared.
- Children: Seek appropriate permission from a parent or guardian before wider publication.
- Sensitive moments: Keep medical, emotional, intimate, or confidential scenes private unless the relevant people agree.
- Unwanted content: Remove duplicates, accidental recordings, and images that don't belong to the event.
- Removal requests: Provide a visible contact route and act promptly when someone asks for an image to come down.
The photo consent forms guide can help hosts turn general consent concerns into clearer event procedures. For a broader example of how a photography business communicates how your data stays protected, review the privacy information before choosing wording for your own page.
Tell guests what control means
Don't hide the privacy notice in a footer. Put the essential information next to the upload action, where a guest can read it before submitting.
QR-photo guidance increasingly identifies consent for recognisable people, children, and sensitive moments as an operational issue, not a minor legal footnote. A privacy-by-design approach means giving guests an opt-out route, keeping new uploads private until review, and explaining who can download, delete, or export files. (Wedding photo privacy guidance)
The host also needs an end point. Decide when uploads close, how long files will remain available, and whether the final gallery is private, password-protected, or shared more widely. Clear boundaries protect guests and make the collection feel intentional rather than permanent by default.
Creating the Final Shared Gallery
A raw upload folder is not the finished product. After the event, remove duplicates, reject accidental or inappropriate files, and group the remaining contributions into a sequence people can enjoy.
Organize by event flow, such as arrivals, ceremony, dinner, speeches, dancing, and late-night moments. Alternatively, use themes such as family, friends, details, behind the scenes, and portraits. The right structure depends on the event, but a coherent order gives guests a reason to return instead of forcing them to search through an undifferentiated file dump.
Close the loop with guests
Keep the reviewed gallery private while you resolve consent questions. Then publish approved highlights through the same branded destination whenever possible, so guests recognize the page and don't mistake a new message for spam.
Before sharing, check:
- Access: Confirm who can view, download, and forward the gallery.
- Quality: Preserve original files for the host while using a convenient viewing version where appropriate.
- Context: Label albums clearly and identify the event date or occasion.
- Control: Keep a removal route visible after publication.
- Timing: Leave room for late uploads if guests were offline or needed help.
The best gallery combines professional photographs with the perspectives a hired photographer couldn't physically capture. That's the value of a structured QR workflow. It doesn't replace deliberate coverage. It gathers the spontaneous reactions, odd angles, family jokes, and private-in-the-moment choices that complete the record of the day.
EventUploader lets you create a branded upload page and printable QR code so guests can send event photos and videos from their phones without an app or account. Set up the page before the event, configure review and sharing controls, and invite guests to visit EventUploader to collect the celebration in one organized gallery.